Destiny 2 Monument of Triumph Oblation: How to Acquire Cull’s Shadow and its Catalysts

Bungie developers have always snuck in secrets for the Destiny 2 community. There was one lying in wait for players as they logged in for the Monument of Triumph update. A new Exotic Mission called Oblation: Bloodline that drops a new Exotic Weapon of Sorrow – Cull’s Shadow. Below is the guide for how to unlock the Exotic Mission and how to complete it to get your reward.
Destiny 2: Unlocking Oblation: Bloodline
To unlock the Exotic Mission, you will need a Weapon of Sorrow on hand.
- Thorn
- Osteo Striga
- Necrochasm
- Touch of Malice
Launch the Scarlet Keep Strike from the Moon destination. Run the strike as normal until you reach the final boss area. Around the area are Hive symbols that you must shoot with your Weapon of Sorrow. After breaking three symbols, the door that Hashladun comes from opens. Turn to your right and inspect the Hive crystal. You must now find four more Hive crystals spread throughout the Moon. Start by heading to the four locations marked on your map.
Archer’s Line
Head to Archer’s Line. You are looking for a fallen Syndicate Trooper surrounded by Hive fire. When you get close, a buff appears on the right side of your screen called “Soulfire Network frequency.” The closer you get, the more the bars fill up. Use this to find the Syndicate. Interact with the dead trooper, and a “Soulfire seethes within a monarch’s Shrine” text appears. The Hive crystal is in the Shrine to Oryx. Make your way to the Shrine. There will be numerous dead Syndicate troopers along the way that guide your path. Upon reaching the Shrine, you face Syndicate enemies. Kill them and shoot the Hive symbols with your Weapon of Sorrow to unlock the door.
Hellmouth
The next signal from a Syndicate trooper is in the Hellmouth. It is right before you enter the Gatehouse. The text “Soulfire roils within the nocturnal chamber ” appears. Make your way into the Gatehouse and towards the Chamber of Night. Follow the dead Syndicate troopers, clear the symbols, and interact with the Hive crystal.
Anchor of Light
Find the next Syndicate trooper, and it displays the message “Soulfire thrums deep within a princely temple”. The text is telling you to go to the Temple of Crota. You will find the Hive crystal there.
Sorrow’s Harbour
The final trooper is in Sorrow’s Harbour. It displays the message “Soulfire surges towards a Sorrowful revelation”. The final Hive Crystal is at the end of the K1 Revelations Lost Sector.
Unlocking the Mission
Finally, head under the Sorrow’s Harbour bridge to find the Exotic mission unlock. After unlocking the mission, you can launch it from the node on the Moon.
Destiny 2: Oblation: Bloodline

Overloading the Drill
After starting the mission, walk forward and talk to Aunor Mahal. When she leaves, drop down towards the Cabal enemies. After clearing them, turn to the tower behind you. There are a couple more Cabal, including an Enforcer. Override the Security Protocol, and three fuses appear in front of you. Head back to the first Cabal spawn. In the middle of the area is the Cooling Pillar. Break the four reactors on the side to destroy them. Head into the cannon and repeat. Kill the enforcer, override the Security Protocol, and break the two Cooling Pillars. Kill the Cabal in the room behind you and overload the drill. Take the cannon into the area that the drill opened.
Navigate the Tunnels
You want to climb to reach the tunnel at the top left. Run through the tunnel until you reach a bridge. Climb up to the top and jump over the building on the right side. Head through the open door and turn left. Before heading into the room with Bael’s shadow, look to the right of the stairs and drop down. Continue your descent and then head forward. Jump up past the Hive enemies to reach the encounter.
Igniting the Soulfire
Kill the Soulfire Vessel with a Melee attack to gain a Soulfire Charge. Run to the middle plate and deposit. Kill two more Soulfire Vessels, one on the right, and one after climbing towards the left side. Deposit in the other two plates to progress.
Valus Tau’Rig
Immediately take down Tau’Rig’s health. It goes down quickly, but then he revealed his Corrupted form. Periodically, the boss will attack you with a crystal attack. Your job is to find one of the Soulfire Vessels. Kill the Vessel and then deposit at the plate Tau’Rig is feeding from. He will become vulnerable. Repeat for the second phase and earn your new Exotic Weapon.
Destiny 2: Unlocking the Catalysts – Oblation: Soulfed
Unlocking the Second Mission
Before exiting the mission, head back to where you killed the third Vessel in the previous room. Jump across the platforms and run to the final bell. Interact with the journal and return to the boss room. You will now see Hive symbols and a door on your right. Shoot the symbols in order with your Weapon of Sorrow. Launch the mission.
Oblation: Soulfed
As you load in, run forward and drop down the hole. At the bottom, avoid the Soulfire. Run out and turn left under a cubby. Run forward and past the Thrall into a bigger room. There is a Soulfire Vessel Knight by a plate. Kill it and deposit your buff. Pick up a worm, turn around, and throw it at the Hive crystal. A path will open on the left side. Take a worm and return to where you came from with the left path. Throw the worm at the crystal and drop down the hole.
You will enter a larger room. The Vessel spawns at the top of the platforms. After killing it, return to the initial platform on the left side to find a room with the plate. Take a worm and throw it at the crystal above on the left side. Take another worm and run through the opening on the left side for the second crystal. The third crystal is to the right of the worm room. For your final crystal, jump up the platforms to the right to find it. The pathway is now open.
Return to the room and drop down the hole. Kill the Vessel and turn around to find the plate. Throw the worm at the crystal near the Vessel’s spawn. It will reveal another crystal. After throwing a worm at that crystal, the door to the left of it opens. Before picking up a worm, turn to your right and drop down to a small platform. Activate the node to open a door deeper in the fortress. It is vital to access the third and fourth catalysts.
Return to the plate and pick up a worm. The crystal is in the room with the plate, look up Guardian. Pick up another worm and prepare to cross the opening to the other side. Be wary of the spawning Soulfire. Throw the worm at the last crystal and run through the open door. Run past the Hive into the opening. As you drop down into a room with multiple Hive doors, look out for an open room on the right. Interact with the journal.
Keep following the path, jumping between platforms to reach the final encounter.
Defeat the Soulfed Hive
There are three bosses in this arena. At first, only the Ogre moves. Find the Soulfire Vessel and deposit it at the plate inside the room under the bosses. Throw the worm at the middle crystal. The Ogre is now vulnerable. Kill it to progress. If you take too long, the shield returns, and you must throw a worm at the crystal again. The other bosses come alive, and you must do the same to them.
- Right crystal – Knight
- Left crystal – Wizard
After killing the bosses, you get the second catalyst. If you did the previous steps correctly by finding the journal, another journal spawns on the boss platform. Interact with it and run outside behind the boss spawns. Take out your Cull’s Shadow. It will now display the Hive symbols you must shoot in order. Shoot them and get the third catalyst. Behind the symbols is the activation for the final mission.
Destiny 2: Obtaining Catalysts – Oblation: Immolation
Jump across the moving platforms, heading one way and then turning around. In the tower with the hive enemies, there is a small hole you must run through. Run into the tunnels. Turn left at the first barrier. Break the second barrier and run through. Clear all the Hive enemies and then backtrack. Jump up into tunnels.
Capturing the Plates
Your goal in this area is to damage the Soulfed Knight. Every time you take 33% of its health, it despawns, and a Soulfire Wizard spawns. Kill the Wizard to open the plate it was on. Stand on the plate to capture it. Be wary of the Soulfire that spawns. After capturing the third plate, the barrier disappears, and you can move through.
Crossing the Forge
Jump up the platforms and progress forward. You will find an opening you can jump through. Avoid the lanterns, kill the Hive, and dodge the Soulfire. Defeat the Shrieker to open the barricade. Watch out for the Soulfire. Cross the platforms to the other side, avoiding more Soulfire. Drop down towards the Forge as you hear screams of a Female Lightbearer.
Ir Gohl
You must put a stop to the Forge. Kill the Wizards around all three plates, and the boss becomes vulnerable. Deal the first bar of his health, and he becomes invulnerable again. Avoid the middle as the explosion from the Forge will kill you. Kill all the Knights by the plates, and one will have Soulfire and two worms. Throw the worms at the crystals. Defeat Ir Gohl and free the Lightbearer. They leave, and you get your final catalyst.
Destiny 2: Cull’s Shadow
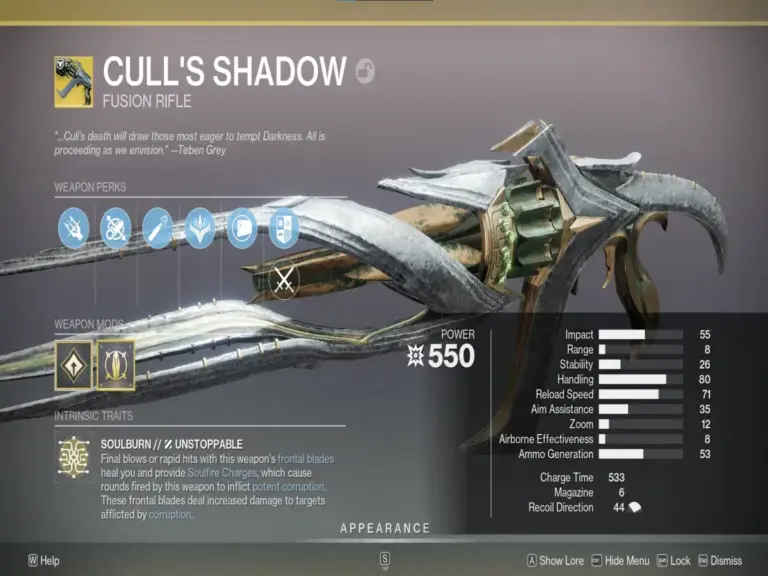
Cull’s Shadow is a Kinetic Fusion Rifle that also counts as a Weapon of Sorrow. It has a melee attack that replaces your standard melee.
Soulbourn – Intrinsic Trait
Final blows or rapid hits with this weapon’s frontal blades heal you and provide Soulfire Charges, which cause rounds fired by this weapon to inflict potent corruption. These frontal blades deal increased damage to targets afflicted by corruption.
Soulforge – Perk
Targets afflicted by corruption from Soulfire Charges coalesce into soulfire crystals when defeated. Crystals detonate in a damaging radius when destroyed.
Soulfire Succor – Catalyst #1
Destroying soulfire crystals with this weapon’s frontal blades provides Soulfire Charges and partially reloads the magazine from reserves.
Soulfire Rancor – Catalyst #2
Soulfire crystals expel potent corruption when destroyed and automatically detonate when a target is within proximity.
Soulfire Zeal – Catalyst #3
Nearby Soulfire crystal detonations increase your damage resistance and movement speed while equipping the weapon.
Soulfire Skewer – Catalyst #4
Nearby soulfire crystal detonations cause this weapon’s frontal blades to inflict corruption.
Related Destiny 2 Content
With the Monument of Triumph update launch, be prepared for more articles on Destiny 2. Below are previous articles we have on Destiny 2.