Overwatch Season 2 Hero Guide: How to Effectively Track Your Opponents Down
After the whirlwind that was Season 1 of Overwatch, Season 2 brings one new hero. Sierra is the 51st hero added to Overwatch. She is a projectile-based damage dealer who excels in mid and long combat. Her kit is relatively simple but has some key intricacies. Mastering Sierra will require learning these intricacies. Fortunately, we have you covered on how to become the best opportunist.
Overwatch: Sierra Kit Breakdown
Recon – Damaging enemies below half health reveals them.
Recon is one of the least impactful subrole passives. It can still help to track down enemies behind a wall for an easy execution.
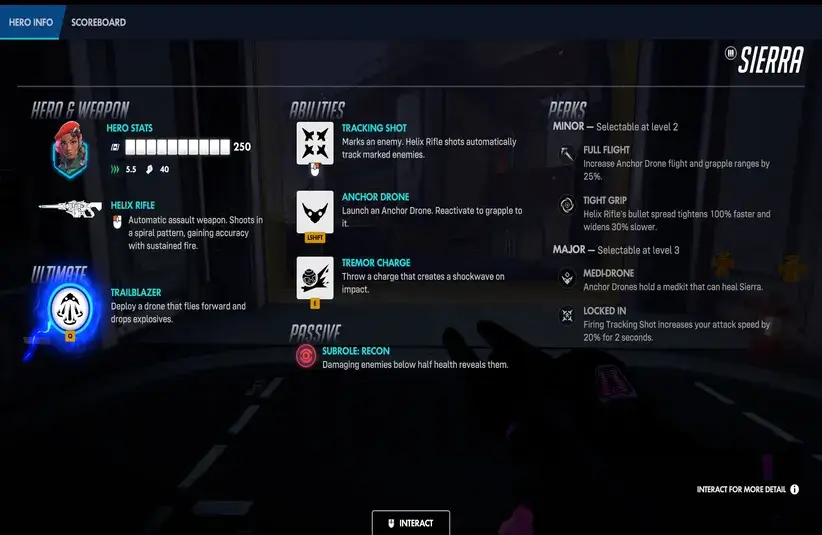
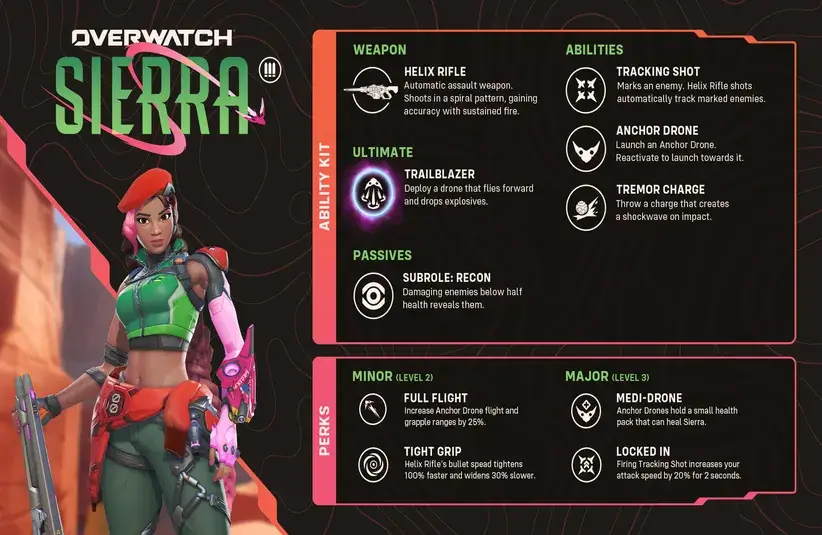
Helix Rifle – Automatic assault weapon. Shots in a spiral pattern, gaining accuracy with sustained fire.
The Helix Rifle has 80 bullets in total. Each burst from a primary fire click uses two bullets, meaning you have 40 shots in total. The spread tightens significantly with sustained fire. Pre-firing around the corner is a viable strategy to allow for a more accurate burst. Spamming angles will often reward you with value.
Tracking Shot – Marks an enemy. Helix Rifle shots automatically track marked enemies.
Tracking Shot is powerful if you can land it on a target. If it lands on an enemy, the Helix Rifle is instantly reloaded and has unlimited ammo for the tracking bullets. Opponents that break the line of sight will have the Shot stuck in them, but your bullets will not track to them. Landing the Shot will be a crucial skill that increases your value. Using Tracking Shot off cooldown will usually go unpunished.
Anchor Drone – Launch an Anchor Drone. Reactive to launch towards it.
Anchor Drone is Sierra’s form of mobility. The Anchor Drone is called Dorothy. You do not need to be looking at the Drone to launch towards it. However, you do need LoS of the Drone and be in range of it. It is a great tool for quick engagement and disengagement. You can also use it to escape danger or to reach higher ground.
Tremor Charge – Throw a charge that creates a shockwave on impact.
Tremor Charge is Sierra’s best form of burst damage. Once the charge makes contact with a surface, it explodes, sending a shockwave forward. The shockwave deals damage and knocks enemies up. Enemies hit in the center take additional damage and knockup. Spamming this ability is a good way to pressure enemies and build ultimate charge.
Trailblazer – Deploy a drone that flies forward and drops explosives.
Trailblazer is a great way to decide a team fight. The total damage of the ultimate is high. If enough explosions hit a Tank, it can be enough to kill. The more verticality you give to the Drone, the more spread out the projectiles will be. If you want to burst targets in a small area, aim Dorothy at the ground.
Overwatch: Sierra Perks
Minor Perks
- Full Flight
- Increases Anchor Drone flight and grapple ranges by 25%.
- Tight Grip
- Helix Rifle’s bullet spread tightens 100% faster and widens 30% slower.
Major Perks
- Medi-Drone
- Anchor Drones hold a small health pack that can heal Sierra.
- Locked In
- Firing Tracking Shot increases your attack speed by 20% for 2 seconds.
Overwatch: Becoming the Ideal Opportunist as Sierra
Ulting One is Enough
One of the problems many players have in Overwatch is waiting to use their ultimate for the perfect time. They want to hit those five-player Graviton Surges. However, the likelihood that you pull it off is low. Sierra’s ultimate is similar. It can wipe a team, but it can also shift a fight with one kill. At the time of writing, its ultimate cost is low, and the damage is incredible. Ulting the Tank, while immoral, is the correct decision most of the time. If they are a mobile Tank, find an immobile DPS or Support.
Pre-Place Anchor Drone
The Anchor Drone has a decently long duration. As a result, pre-placing the Drone will save time in a fight. Another aspect that makes this better is that the cooldown starts to tick as soon as you place the Drone. If the Drone lasts the entire duration, it will almost be back off cooldown.
Drone Placement
Anchor Drone only has 30hp. That means every hero can destroy it quickly. If it gets destroyed instantly, you are without your source of mobility for around ten seconds. That leaves you vulnerable. Plan the Drone placements and also plan your disengagement in case someone destroys it.
More Overwatch Content
Stay tuned for more Overwatch content at Total Apex Entertainment. Below are the guides for the five heroes released in Season 1.